When you talk or hear about training aid in golf, you instantly think of alignment sticks. And why wouldn’t you or anyone when these training sticks are becoming so popular among all kinds of golfers, which doesn’t come as a surprise if you ask me since they help a great deal with alignment.
But then do you actually know how to use golf alignment sticks properly? This part not many understand, especially those new to the whole concept of using alignment sticks that do more than just help with the alignment you know.
So now is the time to get to know the correct, basic way of using these sticks to your advantage as well as the many effective alignment stick drills that improve crucial factors like your golf swing path, ball positioning, putting consistency, and lots more.
In This Post
Alignment Sticks – What Are They?

Think of bright-colored fiberglass sticks 4-feet long – that’s what alignment sticks used for golf look like. The material, fiberglass, is pretty durable. Thus, strong enough to not bend or break despite being subjected to heavy beating.
And all types of golfers are using them – amateurs, Tour players, and even junior golfers. After all, alignment sticks have proven to be incredibly versatile since you can use them for more than just improving alignment. And despite being so versatile and productive, the cost is quite inexpensive (professional golf swing lessons will definitely cost you more).
The design is lightweight, hence easy to swing/handle and also carry with you anywhere (practice on the range, course, backyard, wherever you like).
A minimum of 2 alignment sticks seems to be enough but then you can carry a 3-piece set as well if what you want from it is more flexibility in terms of working on more than just one or two drills at the same time.
Alignment Sticks – Why You Should Use Them?
A flawless golf swing sequence is only beneficial if it can be performed consistently throughout your round of golf. Consistency, no matter what, is always a useful thing in golf. But, unfortunately, it’s also the most difficult to achieve. And one of the primary reasons for that is not being able to get the alignment done right.
Struggling with alignment almost always leads to messing up consistency. When you don’t measure your alignment and instead just imagine it, the end result is inevitably going to take the form of mis-hits, incorrect stance width, and inconsistent swings.
So, at such times, alignment sticks can really help when it comes to creating actual physical lines you can see that provide consistency. With them, perfecting your golf swing becomes much, much easier. Along with compelling you to take the right stance width. Think of them as visual gates you use for hitting your shots.
Alignment Sticks – Basics of Using Them Properly for Practice
You can play as many real golf rounds as you want. This particular approach, no denying, does help as far as practice sessions are concerned.
But have you thought about how that can just as well be encouraging bad swing mechanics or any other mistakes you may have gotten used to? Just because you’re practicing doesn’t mean you’re practicing the right techniques, right?
On the other hand, practicing with alignment sticks genuinely encourages significant improvements. The most basic or common way of going about it is to place the sticks down onto the ground for visually displaying your alignment. This is the most effective (and more importantly, the correct) way of going about practice sessions.
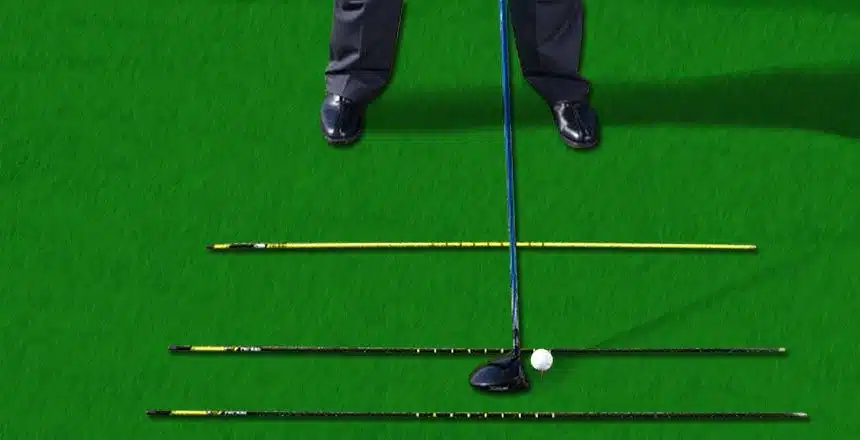
You’re actually creating that target line as well. Just lay them down – one alignment stick facing the intended target, behind the golf ball of course, and then the other stick lined up in a parallel position to that first one closer to the feet. Hence, your feet have been correctly lined up in the direction of your target.
All that’s left to do now is remove the stick trailing the ball, then simply just swing away!
Alignment Sticks – How to Use Them for Different Purposes?
1. For Shot Shaping
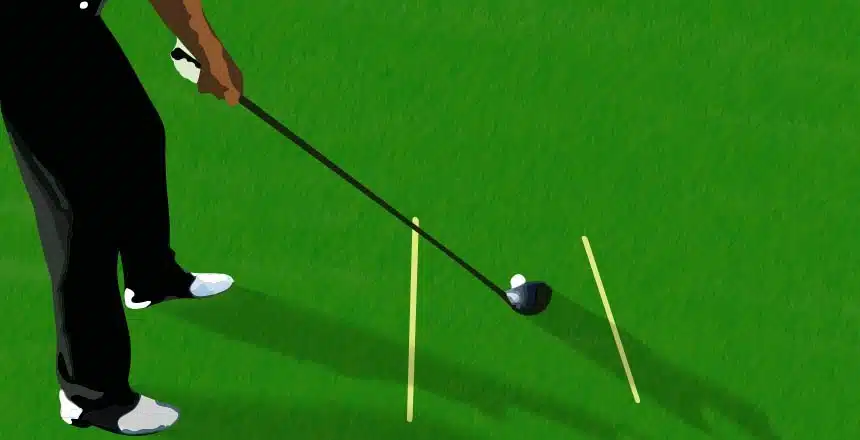
Improve the way you shape your shots by placing one alignment stick directly on that ball-to-target line. It should be around 4 meters from where you take your stance. The whole point is to recreate the setting of a tree getting in the way of your intended target line. So this means you have to shape your shot around that tree.
That implies using alignment sticks to hit a draw or fade. Your main focus here should be to start the golf ball either toward the left or right of the alignment stick and then try to shape the shot back. So you’re actually learning how to manipulate or control ball flight.
2. For Swing Plane
If your golf swing is too dramatic, it’s about time you tone it down with the help of an alignment stick. Lay it on the ground at a 45-degree angle. Place the stick behind you at that angle and make sure that its position is matching the club shaft angle during address.
Meaning when you hinge your wrists at address, the shaft angle of the club and the angle of the stick have to be the same. This then ensures that the golf club passes directly under the alignment stick plane as you’re swinging down – also known as an ‘inward-to-outward’ swing path.
So if you’re an amateur golfer, this should solve most of your swing-related problems!
3. For Ball Striking
Correct your angle of attack using alignment sticks!
2 sticks are placed on the turf – one of them marks the position of the ball and the second marks the golf club’s low point in the swing. The latter is closer to your target by an inch.
And now try hitting some shots. At this point, with the help of these alignment sticks, you can tell if your ball strikes have an angle of attack that’s downward.
4. For Long Game Alignment
Learn how to aim right, which includes perfecting your body and club alignment.
One stick is placed on the target line. The alignment stick, in comparison to the golf ball, should be a few feet nearer to that target. Then take the second stick and get this into a parallel position with the first. This second one marks the positioning of your feet, shoulders, and hips.
Next, get into address with the clubface pointing in the direction of that first alignment stick. So your body is parallel to the target line, thus the alignment of both your body and golf club is how it ought to be.
5. For Swing Path
Practice either at home or at the range to improve your swing path.
Hold the alignment stick in a way that, during address, it touches your lead or dominant hip. And now perform your practice swing – keep it slow, steady, and deliberate, stopping at a few key positions just for checking the direction in which your alignment stick points.
Halfway through your downswing, the aim of the stick needs to be slightly toward the right of the target line. Hence, you get that perfect, subtle inward-to-outward swing path.
And at impact, it should be near the left hand. Finally, during finish, make sure the alignment stick doesn’t come in contact with your body.
6. For Putting Pace
To get the lay of the land (pace of the green that is), this particular alignment stick drill is a brilliant one. You lay it down onto the ground away from the hole. And keep the stick wider in comparison to the putter grip length.
Now comes the part of hitting the putt with enough pace for reaching the hole and, at the same time, not touching the stick.
You can do this for all kinds of putts – across the hill, downhill, and uphill – for establishing a good relationship with putting pace.
7. For Putting Alignment
And now you get to improve one of the most important golfing skills – putting stroke consistency. Just to achieve the same, there are more and more heavy putters being designed that are perfect as far as holding a true line is concerned.
With the help of this alignment stick drill for putting, you can strengthen and stabilize your putting foundation. Something that can also be achieved with the help of top contenders like these TaylorMade putters.
Around 15 feet – that is the kind of putt you need. And also ensure that this putt has a decent level of break. Hit some practice putts on your own first, so you get an idea of the break. And now place the alignment stick on that green, it should point in the direction of the rolling path of the golf ball.
Addressing the ball with the stick, the latter helps in properly aligning your body and clubface, hit as many putts as you like. This drill will eventually force you to take the right address position each time.
8. For Chipping Strikes
It’s very simple – lay down an alignment stick that faces the target, outside the trail foot of course. Hit a few chip shots without the ball touching the stick.
Consequently, you’ll reach a point where you’re producing a shallow yet downward strike. Just the kind of approach needed for chipping!
9. For Chipping Technique
Chipping, no doubt, is one of the most difficult tasks. The most common mistake here being flicking at the golf ball as a result of an excessive wrist hinge during impact. So you end up losing control of as well as distance on your shots.
And now here’s an effective solution. Grip the golf club while also holding the alignment stick, the latter should go beyond that left hip of yours. And even when performing chip swings, make sure the stick isn’t touching your left side of the body.
Grooving the action and then hitting some chips should eventually lead to the formation of a more solid chipping technique.
10. For Bunker Striking
Bunker shots have to be played a certain way, right? And that’s precisely why so many golfers struggle with it. You’re supposed to hit the sand first and then the ball. Easier said than done, which is why I think you’ll be needing this particular alignment stick drill.
In the address position, place on the sand both alignment sticks. The first one marks the ball position with relation to the feet while the second stick marks the point at which your golf club will enter/hit the sand. Pushing those sticks into the sand for forming two lines is the way to go, and then no need for the sticks anymore.
Moving on, take a few practice swings away from the golf ball with the intention of striking that first line. Then just recreate the same effect at the time of actually hitting the golf ball. The ball, as a result, is most likely to land softly onto the green, cushioned by sand.
Video Guide to the Different Types of Alignment Stick Drills
Enough with the words, now how about some very useful, effective, and instructional videos that demonstrate how to use these golf alignment sticks in the most straightforward manner to improve more than just alignment and/or accuracy…
The End
It’s simple using alignment sticks, even the drills are pretty easy to understand and execute. Plus, they’re very effective when it comes to improving your swing mechanics.
And to make matters even more favorable, alignment sticks are quite cost-effective, along with being lightweight to handle/swing. And they’re proof of the fact that mastering the most basic techniques in golf can make you a better player and make the game of golf so much more enjoyable as well.