
In golf and even life in general, you’re always doing the opposite of what you’re “supposed” to do. Well, that may be a bit of an exaggeration but you get my point, right? Now I’m not a life coach, so I can’t help you with life skills but I can certainly get you to hit the golf ball as long as you’re supposed to.
Oftentimes, beginner golfers ask me why they’re outperformed by players of smaller physical stature than them. How can shorter, less bulky golfers hit their shots a lot farther than them? And my only answer to them is the golf swing sequence. If you’ve got that all messed up, you might as well just forget about producing a powerful swing that spawns more speed.
Every golf swing, once again, is “supposed” to be a solid athletic motion requiring movements like winding plus unwinding the body while your club takes a rounded or circular stroke. This means getting your body and, at the same time, your club too in sync, which is the correct sequence, for that speed-boosting golf swing at impact.
Meaning you have to follow a certain set of instructions to get that order or sequence right (backswing, downswing, follow-through). And this article is all about that!
In This Post
Acing/Improving Your Golf Swing Technique Can Boost Clubhead Speed
When you work on your golf swing technique or sequence, you’re actively and effectively increasing your clubhead speed as well. Because you learn how to optimize the power of your body by maximizing its full potential.
Now I understand that every golfer, especially those inexperienced, often feel that they should create a swing that “feels more comfortable” above anything else. This, however, is not such a bad idea unless you don’t mind losing clubhead speed along the way.
Nonetheless, there’s no universal sequence here, that’s for sure because not everybody’s swing/physique is the same. But you have to factor in a shared baseline or foundation that has proven to work. And a proper, well-established swing sequence is a great way to start!
You might think that strengthening your muscles will help to boost clubhead speed. Of course, it will and does but that can only go so far if your golf swing technique itself is off. And the same applies to flexibility training, overspeed training, etc.
Proper Golf Swing Sequence – How to Get It Right?
If you’re interested, you can have a look at the Golf Digest Swing Sequence of some of the best Champion players.
And now it’s time for you to correct yours!
Now I’d also like to add that not every golf swing is identical. You should keep in mind that we each have our unique tendencies when working on the swing. So don’t over-focus on any one aspect. The ultimate goal instead is to establish consistency in terms of how your golf swing is performed.
So there’s absolutely nothing wrong if your trademark rhythm is different from my popularly known unconventional swing motion.
Here’s the super-slow version of my golf swing.
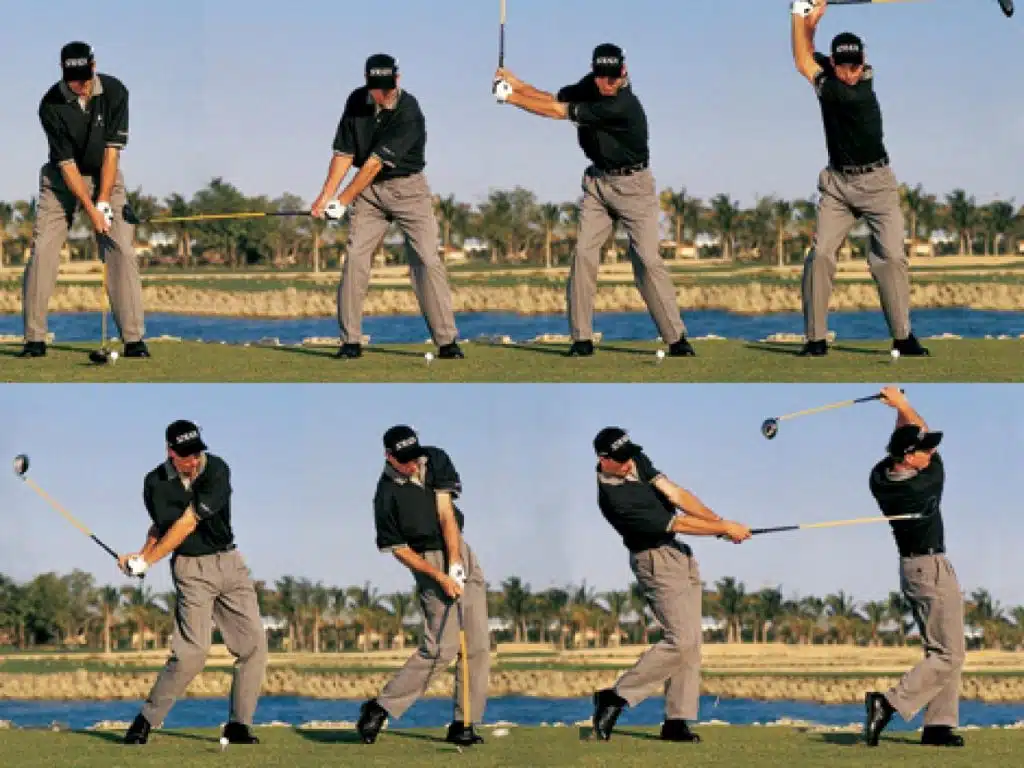
1. Your Stance and Address Position

Let’s begin with your almost motionless stance right at the start of your golf swing. Think of this as your very foundation i.e. setup position, which means it has to be correct. Otherwise, your chances of messing up in your downswing and just finishing your shot unsuccessfully become very high.
So the proper setup position starts with a straight back with slight bending at your waist. DO NOT bend too much at your knees (beginner and amateur golfers do that a lot). Just a slight bend is more than enough with most of that tilt coming from your waist instead.
Moving on to your arms now, keep them loosely and naturally hanging straight down while gripping the golf club. Avoid extending your arms (down or up).
And then your stance, that means your feet should be placed shoulder-width distance apart. The golf ball is supposed to be positioned in the center of that stance.
2. Your First Half of the Swing, Known As ‘Takeaway’

So that time/movement between your address position and your hands and club at waist height is called takeaway.
When starting the golf swing, don’t forget to use your dominating, big muscle groups and not your small muscles. In simpler words, begin that first swing movement using your arms and shoulders, not your wrists. This way, you can draw your golf club backward directly along your target line till your hands are almost at waist height.
You should also focus on slightly rotating the clubface to get its toe section to point straight up (almost) when your hands are at waist height. The rotation here also paves the way for the golf club to maintain its plane and encourages the clubface to very effortlessly return in that perfect squared position to the golf ball.
A common mistake at this point would be to keep that clubface pointing in the direction of the ball for a very long time. However, it’s not actually possible to do this, plus it negatively impacts factors like direction and distance.
3. The Top of Your Backswing

Just when your hands are at waist height, the top of your backswing begins. This is the final movement in the backswing before the hands and club start the downswing sequence to the ball.
At the top of your backswing, hinging your wrists slightly more in comparison to how they were during the first part of takeaway is important. Then, using the same big shoulder muscles, turn the body as well as your arms around while also now putting those small muscles to use by pivoting.
This is when your golf club reaches over the head, so finish that backswing with the club facing the target and not pointing toward the left or right (amateur golfers, please take note of this). Because you obviously don’t want excessive movement at this point of your swing since that’s likely to produce a whole set of various errors.
So make sure that the golf club shaft remains at level with your target. Maybe shoot a video of you doing this or have someone check the top of the backswing for you, so you can notice and then correct any mistakes you seem to be making.
Moving on, finish your backswing with the club in a direct parallel position to the turf. Anything past parallel and you’re “crossing the line” and unnecessarily welcoming too much movement that gets in the way of hitting a solid strike.
So don’t take the golf club excessively far, even though you may think it means adding more distance. That’s not what happens, believe me. Stop when it’s parallel instead to maintain not just speed but also balance, timing, and accuracy.
4. The Very End of Your Backswing, Known As ‘Transition’

Think of your body and golf club moving in an opposite direction toward the ball – this is transition and it’s very crucial because you have to move all your body parts in unison. That’s actually why I highly recommend a comparatively slower backswing. Don’t go too fast just because you think it increases distance. Keep in mind that speed matters more only during your downswing, not during the backswing.
Instead, with your backswing, all you want to do is reach your transition point and, at the same time, keep your balance and time that transition for moving all body parts together. And when the backswing is fairly slow during this time, the whole transition part becomes much easier.
Once the peak of your golf swing is reached with your hands (with the club in a parallel position to the turf), there will and should be a very slight pause in the swing for initiating the downswing.
After this slight pause, use the lower half of your body for rotating the hips as well as your torso toward the ball. This is how your downswing begins. The club and arms then follow the natural movement of the lower body and you shift your weight back into the dominating or leading foot.
5. Your Downswing Sequence
Drop your hands down, which means don’t follow that same path you did during the backswing. Down as well as inside the path toward the golf ball – now that’s the right approach!
Let gravity take over at this point, so the club and hands drop down a bit as the transition to your downswing begins.
When I say downswing, it’s that time when you throw the hands and your golf club at the ball for making contact.
During the downswing, your elbow, the back one (right elbow if you’re right-handed), should stay close or tight to the ribcage (no need to make contact though). I have seen many beginners and amateurs making the mistake of allowing the elbow to form that “chicken wing” i.e. flare out. Don’t do that because then you end up creating a very difficult-to-control slice.
Now we have the ‘wrist hinging’ part of the downswing sequence. Maintain the wrist hinge for as long as you can. Don’t release the hinge right after transition is what I mean to say here. ‘Casting’ is what the release of the wrist hinge is called in golf (like casting the fishing pole).
When you cast, your wrists lose all that built-up power-boosting tension and energy. Instead, encourage the much-needed ‘lag effect’ (it refers to maintaining the accumulated energy).
And then there’s the ‘positioning of the back heel’ that also plays a major role in every backswing. Tour-grade players, including me, deliberately let the back heel rise from the ground a little right before impact as it helps in achieving ‘extra’ yardages. However, this coming up of the back heel tends to compromise and/or complicate accuracy.
So to avoid making the game of accuracy challenging while also trying to hit longer, let that raising of the back heel happen naturally. But if you prioritize accuracy more than distance, then it’s important for the heel to stay on the turf until impact. Then after impact, it can and should come up for a solid strike.
6. Your Impact Position
Every golfer worth his/her salt knows how important this impact position is in the whole swing movement. It’s only during impact that the golf ball and club come into contact with each other. So that contact better be a good one!
Impact position consists of three different types:
Fairway Shots
Your traditional iron shots (also known as fairway shots) require the clubhead to move downward into the ball. Meaning the golf club first hits the ball and after that makes contact with the ground, not vice versa if you really want to sweep the golf ball cleanly and smoothly off the turf.
Hitting down like this is also very important as it increases that distance and accuracy boosting backspin on the golf ball.
Also keep in mind that your club should be approaching the ball from the inside slightly as your golf swing is, at this point, rotating around the spine. And to make this whole setup easier for solidly-hit shots, novice golfers must choose beginner-friendly golf irons.
Driver Shots
Then you have the driver impact position (off the tee). Even if you’re using one of the best golf drivers of all time, your impact position plays a huge part. And for this too, you should be approaching the ball from inside slightly. The contact between clubhead and ball is made on the latter’s underside, and that’s how it goes up into the air more effortlessly.
So even in your driver impact position, hit the golf ball first and then the turf, not the other way around.
Sand Shots
I’m talking about only bunker shots here in this case. So the impact position for that consists of hitting the sand and then sliding your golf club underneath the ball. Unlike driver and fairway shots where the first contact is made with the golf ball and then with the ground. Because in sand shots, the movement of sand particles is what moves the ball.
So golf ball movement here has less to do with the impact or contact of your club with that ball. Understood?
With that logic, a factor like how deep is the sand inside the bunker decides how early your golf club hits the sand. Therefore, the deeper the sand means the impact with sand is made further behind the golf ball.
7. Your Follow-Through and Finish Sequence
And now finally we reach the end of your golf swing – follow-through and finish.
Follow-through is the point right after impact when the body follows the golf ball. This is the time where you shift your weight to the front foot and raise the back heel (but keeping the toe in contact with the ground). Along with moving your chest and belt buckle toward your target. So you’re aligned toward the intended target and finish the shot with balance!
As for the arms, rest them on your front (left) shoulder, if you’re right-handed. Your golf club is now pointing behind you with your hands resting comfortably on your shoulders or behind your head.
Final Note…
Your full golf swing with your driver, irons, etc. really matters if you genuinely care about your clubhead speed, the distance you achieve, and also when it comes to hitting with more accuracy. But to accomplish all of this, you need to establish a solid foundation i.e. a proper golf swing technique/sequence.
This includes your stance and address position, takeaway, top of the backswing, transition, downswing, impact position, and follow-through and finish. These are basic fundamentals that you have to get right, maybe in your own way too, for hitting longer, straighter shots.
And every dedicated golfer has to work hard on them if they really wish to move their clubs toward the ball with solid motion and then enjoy that effortless, flawless chain reaction that always accompanies a good consistent swing.