Ugly shots in the form of a slice are actually very commonly spotted when on the course. Slices, which are just missed shots, have troubled almost every amateur player in the history of the sport.
When you think about it logically, a slice – ball flying toward the right if you’re a right-handed golfer – seems like it can be rectified if you simply swing in the opposite direction. Unfortunately and shockingly, this will only make it worse!
There’s a lot that goes into forming a slice and a lot into fixing it, so let’s get to the bottom of the issue and eliminate it from the root itself.
In This Post
- First and Foremost, What Is A Slice In Golf?
- 5 Most Common Causes of A Slice In Golf
- Best Ways to Avoid Slicing the Golf Ball
- How to Fix A Slice – 7 Most Effective Tips to Cure Slices Quickly!
- Tip #1 – Play the Right Golf Clubs
- Tip #2 – Adjust Setup (Alignment + Ball Position)
- Tip #3 – Strengthen the Grip
- Tip #4 – Square the Clubface Sooner (Hank Haney’s “3-Part Slice Drill”)
- Tip #5 – Swing the Golf Club Like A Baseball Bat
- Tip #6 – Don’t Aim Left
- Tip #7 – Practice This “Muscle Confusion” Drill
- Hook vs. Slice
- Slice vs. Fade
- Do Golf Alignment Sticks Fix A Slice?
- How to Prevent “Coming Over the Top?”
- Why Does Your Driver Hit A Slice But Not Your Irons?
- The Wrap-Up
First and Foremost, What Is A Slice In Golf?
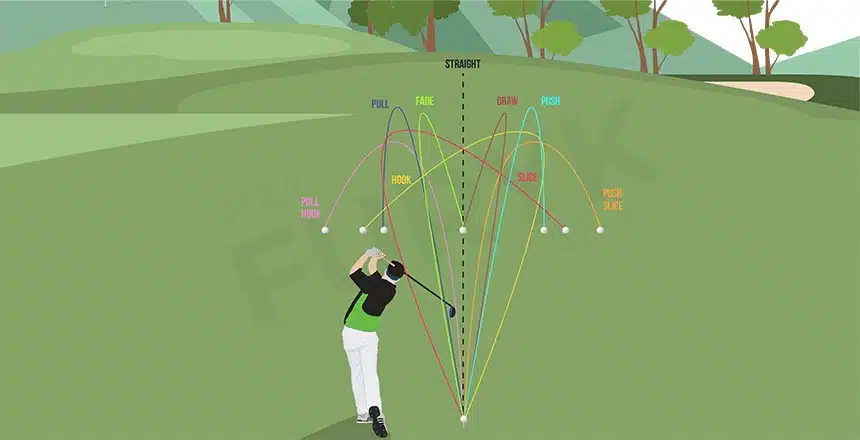
Curving the ball flight is reality while hitting straight down the fairway is the dream. Not that dreams never turn into reality, but you have to work toward achieving that, which is something I’ll talk about eventually. As for now, let’s discuss what a slice in golf looks like.
A curved ball flight, where the golf ball curves away from your dominant hand – that’s a slice! But this is not necessarily a bad thing, just to be clear. For instance, when the ball fades, or curves, toward the right (for a right-handed player) or draws toward the left, navigating the golf course becomes easier precisely because of that curve.
On the other hand, you have a slice, which is also a curve (toward the right) but a dramatic one. Where fades and draws are mostly planned and controlled, slices are the opposite.
A slice, no denying, is a poorly hit shot that leads to giving up distance, taking you off the course, and, as a result, adding more strokes to the game. So when you learn to fix your natural slicing tendencies, you’re actively lowering your golf scores.
5 Most Common Causes of A Slice In Golf
1. Too Dramatic Swing Motion > Steep Downswing
An open, not closed, clubface is probably the most common and likely cause of slicing the golf ball. Why the clubface is open, to begin with, has a lot to do with your swing sequence. If your swing motion is “over the top,” you’re inevitably going to start left, thus slicing back toward the right.
How open that clubface is during impact determines how far to the right the ball curves. Hence, now you understand why misses with the driver are so exaggerated since it’s a lower-lofted and longer-shafted golf club than, for instance, irons. So with a loft between 8 and 11 degrees, drivers create a more magnified curve from the left to the right in comparison to an iron that’s higher-lofted.
Such a flawed swing path causes an unnecessary steep downswing, thus errant shots are generated. So how about correcting your complete golf swing sequence to not just prevent slicing your shots but also for increasing clubhead speed!
2. Grip May Not Be Strong Enough
Have you thought about how weak or strong your grip is?
How to grip a golf club correctly is extremely important, and why is that? Because it’s the positioning of your hands on your golf club that controls clubface orientation at impact. A proper grip allows your wrists to perform the required movement more fluidly, thus strengthening the movement of the club.
When the grip is weak, it pushes your shot slightly to the right from the left. On the other hand, when the grip is strong, creating a draw is more likely. Both, unquestionably, are unfavorable situations.
With that in mind, how about keeping the grip neutral, so a comparatively straighter flight path of the golf ball can be achieved. This means you can work the ball both ways!
Now it’s only common, more common than you’d imagine, for right-handed golfers’ left hand to be weak. Certainly, this does affect the club path. To be more specific, it takes the golf club inside a bit too far. As a consequence, this produces an over-the-top, steep downswing. And that’s how you end up with thin shots, errant shots, big misses, etc. with your driver and irons.
The moral of the story then is to strengthen that golf grip of yours. Fixing this particular grip-related issue corrects not only your path but also ensures proper weight transfer during the swing motion, better contact with the golf ball, and longer distances.
3. Improper Alignment
It can’t be said enough that golf alignment must absolutely be done right if you want your shots to travel straighter, and longer too. Proper alignment is the very foundation of playing golf the correct way. The way you’re addressing the ball decides the workings and success of your swing.
Proper golf swing path and closed clubface become easier goals to achieve when you know how to aim in golf.
Don’t activate your slice even more, which is a mistake many golfers make when they aim farther left with the driver. You might think that aiming so far to the left will solve the problem, but please note that this is only going to produce an even more exaggerated slice.
Fix the issue at hand merely by getting the alignment part of the process done right.
4. Starting Your Swing with Arms and Shoulders (i.e. Active Upper Body)
It’s the lower body that moves first, not the upper body. What should happen is that your body weight ought to shift to the dominant foot and then you start twisting your torso down to the ball instead of beginning your downswing with the upper body.
Listen to Ben Hogan when he says that you should be initiating your downswing by turning those hips toward the left and then unleashing the potential of your shoulders, arms, and hands.
Refrain from starting your golf swing with the arms or shoulders i.e. upper body. When this is overly active, your body is surely more likely to rotate. And that’s how you pull (slice) the golf ball because of the clubface being open at impact.
5. Heel Hit
The golf ball is definitely going to take on a more toward-the-right curve when it’s the heel of the club that makes contact as opposed to shots struck in the center.
The problem-solver, in this case, might take the form of a larger, more forgiving sweet spot that is a feature you always get with the best golf drivers for distance or the best drivers for beginners, seniors, and women.
Best Ways to Avoid Slicing the Golf Ball
Since alignment and grip are among the most common causes of hitting slices in the first place, how about the most effective solutions being adjusting your grip and re-aligning your shoulders, hips, and feet?
The goal is to square the clubface at the point of impact. However, this is easier said than done, right? But you can and have to start from somewhere!
1. Adjusting the Grip
How to avoid a slice instantly? Get rid of your weak grip!
Keep your hands from rotating too far in the direction of the grip’s target. It can be done through a quick change in your golf grip. You should be able to see, in the address position, your left-hand index finger knuckle, and maybe even the middle finger knuckle. Also, ensure that your right hand rotates away from that target in the most appropriate manner.
At first, these kinds of grip adjustments might seem and feel slightly awkward, but this one has proven to be super-effective when it comes to correcting your grip to hit straighter shots.
2. Re-Aligning the Shoulders, Hips, and Feet
As you change your grip, re-aligning for straightening the shot is most likely to happen in a much easier way.
It’s very common to see golfers pointing their shoulders, hips, and feet toward the left of the target. When your hands rotate away from the grip’s target, the shoulders may be closer to aligning properly yet not completely. However, if you get your shoulders, hips, and feet to be parallel with your target line, it becomes more accessible for you to swing your golf club down or along the line as opposed to across it.
How to Fix A Slice – 7 Most Effective Tips to Cure Slices Quickly!
Reduce your chances of slicing the golf ball simply by incorporating the following practices into your game. Who knows you might even be able to finally draw your shots with the help of these very simple yet effective tips!
Tip #1 – Play the Right Golf Clubs
You can forget all about the foundation and mechanics of golf swing, grip, alignment, etc. if you’re not using the proper equipment. Don’t ever listen to anyone who tells you that golf clubs don’t matter, rather it’s how you use them that counts. While that may be true to a certain extent, there’s also no negating the fact that your clubs do and will determine ball flight.
So the first thing that comes to mind as far as using the correct golf equipment is concerned is shaft flex. When there’s excessive flex, squaring the clubface during impact becomes very challenging. Hence, no matter what, always choose the right shaft flex based on your swing speed.
- Regular (‘R’) flex – golfers with a swing speed between 85 mph and 95 mph where the average driving distance is between 200 yards and 240 yards.
- Senior (‘A’ or ‘M’) flex – golfers with a swing speed between 75 mph and 85 mph where the average driving distance is between 180 yards and 200 yards.
- Ladies (‘L’) – golfers with a swing speed below 75 mph where the average driving distance is under 180 yards.
- Stiff (‘S’) flex – golfers with a swing speed between 95 mph and 110 mph where the average driving distance is between 240 yards and 270 yards.
- Extra Stiff (‘X’) flex – golfers with a swing speed over 110 mph where the average driving distance is above 270 yards.
Related: Senior Flex vs. Regular Flex vs. Stiff Flex, Graphite vs. Steel Shafts
Beyond the proper-shaft-flex realm, there’s the adjustable driver with its clubface settings. How an adjustable driver works is that it comes with a wrench or tool for creating a draw-biased or neutral setting.
If you ask me, these adjustable drivers have time and again demonstrated that you can get your slices to travel back into fairways the most effortlessly.
Tip #2 – Adjust Setup (Alignment + Ball Position)
Have nothing to do with slices anymore once your golf swing path has been corrected. This means getting rid of an overdone downswing i.e. a steep, lag-deficient downswing. Just follow these very straightforward instructions below…
- In your head, try aiming left instead of right. Keep your feet and shoulders squared to your target, meaning “open stance.” This clears the left side and, in turn, generates more solid, straighter shots.
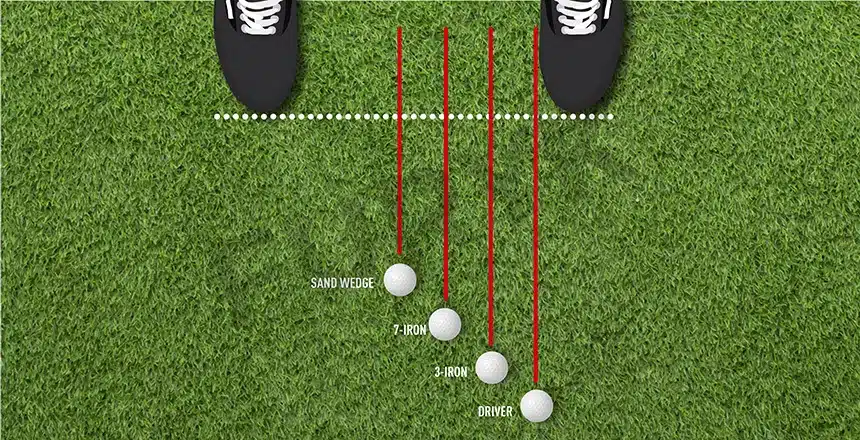
- For driving the golf ball straighter and longer, make sure it’s positioned off the front foot (right foot if you’re a left-handed golfer). A little behind in the stance increases the likelihood of creating a steep downswing and also messing with weight distribution.
Instead, the golf ball needs to be off the front heel a little more, so you can hit up for boosting launch angle.
Tip #3 – Strengthen the Grip
Big slices can indeed be controlled with the help of a strengthened grip. A weak or poor grip, on the other hand, is bound to ruin your potential and game.
Agreed that a new grip might feel slightly uncomfortable, strange, or awkward at first, but you should understand that it’s much-needed if you want to correct swing path, clubface position at impact, and also add greater power to your shots.
Find out right away how to grip your golf clubs properly (complete guide for beginners), so you can prevent the ball from moving 20 yards or so from the left to the right.
Tip #4 – Square the Clubface Sooner (Hank Haney’s “3-Part Slice Drill”)
Whether you strike a straight shot or draw or slice the ball will be decided by the clubface position during impact. Generally, the combination of a longer driver shaft and faster swing speed is not the most conducive to squaring the clubface at impact.
With that in place, if you’re hitting giant slices, chances are high of the clubface being open during impact. So why not try to square it up a little earlier into your downswing?
Here’s Hank Haney demonstrating his highly acclaimed, super-effective 3-Part Slice Drill:
Tip #5 – Swing the Golf Club Like A Baseball Bat
It’s called the Baseball Swing Drill.
Just practice the baseball swing with your 7-iron. Here’s how to go about it…
- Wrap the golf club behind, around the body like when you hit a baseball. Make sure your club is leveled. You should feel your hands rotating around and then turning over, thus paving the way for hitting more draws.
- Once you cover a few practice swings, start rolling over the hands sooner to encourage the effect/feel of slightly closing or squaring the hands at the moment of impact.
With the clubface square, needless to say, straight shots are issued. At the same time, with the clubface slightly closed, your chances of acquiring a draw are also very high.
Practice the drill around 10 to 15 times and then take your shot on the driving range.
Tip #6 – Don’t Aim Left
Here’s what I mean in case you’re confused…
As mentioned earlier, aiming more toward the left in order to counteract your slicing tendencies is only going to magnify or worsen them. Rather you should be teeing off the right of the box. That way, you gain more space in terms of working the golf ball off the left of the rough or fairway.
Tip #7 – Practice This “Muscle Confusion” Drill
Anything at this point is worth trying if you simply can’t get your slices to budge, right? So why not try the famous muscle confusion drill? Without a golf ball!
- Keep the feet together with your 7-iron or 6-iron. Create the backswing motion to its max. limit. But remember to keep the golf club lower than usual since your feet, because they’re together, are forming a more compact swing path.
- Now allow gravity to take over, meaning let the arms drop naturally with the right elbow hitting the side and making way for the clubhead. The head, as a result, flies out and the end of that golf club comes up close to the face.
How do you know you’re doing it right? When the ‘muscle confusion’ drill is not practiced correctly, the club tends to wrap around the body, hence generating a slice.
Hook vs. Slice
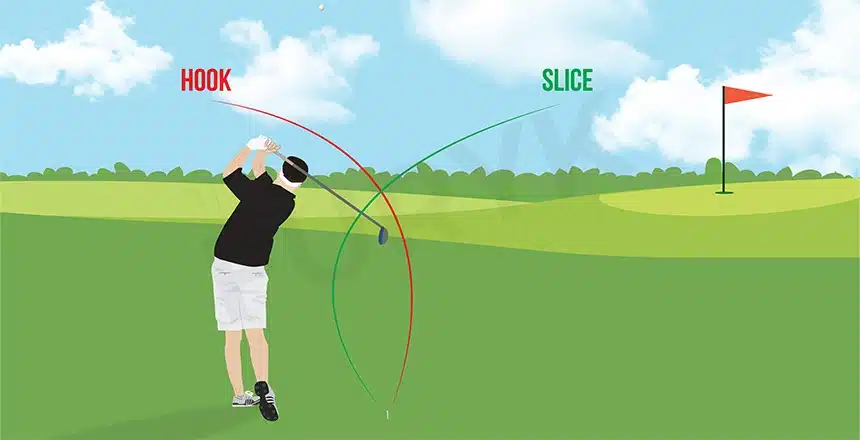
A slice, as already discussed, is a curve that veers off toward the right, whereas a hook curves toward the left. In other words, slices are fades gone wrong and hooks are draws gone wrong.
When the clubface is open at impact, you end up slicing the ball. While hooked shots are the result of a closed clubface on impact, you can do this either accidently or deliberately – here’s how to hit a hook, so you can gain extra yardages on longer holes.
Although it’s not uncommon to also hit slices as a result of a closed clubface through impact, it’s mostly beginners that get stuck with slicing their shots because of the open clubface orientation.
Slice vs. Fade
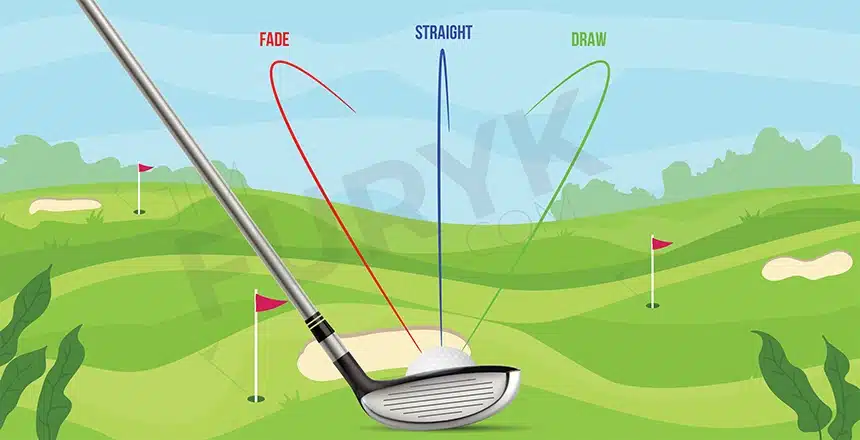
You know it’s a slice when the ball flight curves toward the right. But the same can be said about a fade actually. So how to differentiate between the two? Well, fades are controlled shots, meaning you can hit one purposely if you know how to hit a fade.
A fade takes on a ball flight that curves not more than 5 to 7 yards off the target.
In the case of a slice, this golf ball will curve to the right even more – as much as about 15 yards off that target line.
That’s why fades are more controlled shots in comparison to extremely wayward slices that look like a peeling banana.
Do Golf Alignment Sticks Fix A Slice?

The whole purpose of the best golf alignment sticks is to get you closer to improving both swing path as well as aim. No wonder it’s called a training aid in golf!
Alignment sticks are just slender, club-shaped sticks that you place on the turf, so they’re like visual aids that help align the clubface and your body at address. Here’s how to use alignment sticks the most effectively.
But how to use them for correcting or minimizing a slice?
- First of all, the goal here is to encourage proper setup and improve upper body alignment. Because when that happens, you come back down, in your swing, to the golf ball maintaining a good swing path. Open shoulders during setup are unavoidably going to lead to a slice.
- On your backswing, you should be focusing on activating an almost 90-degree turn. So, at such times, an alignment stick can really be useful to check whether or not you’re turning or rotating fully. And just knowing this adds enough depth and power in the backswing, which will certainly, on your way down in your backswing, create an inside path.
- Meanwhile, in the upper body, consistent elbow spacing is ensured. Your arms don’t swing too far, even the right elbow keeps from flying or moving away from the body.
Instead, your body and arms are well-synchronized to give rise to that much-needed powerful-swing-like feel.
- Then into impact and follow-through, this same downswing connection belt very seamlessly allows you to release that clubface with adequate force and, most importantly, squarely.
So no more having to deal with chicken-winging your lead arm at impact. Meaning no more having to deal with the clubface being open through impact and generating a slice.
How to Prevent “Coming Over the Top?”
It’s when the golf club goes excessively away from the body during the top part of your downswing. This mostly occurs as a result of not allowing natural movement to take place, which involves dropping down your arms, hands, and club and approaching the ball from inside.
Rather most amateurs swing the golf club, thus forcing it during impact and allowing it to literally come over the top and then extend away from your body. Solid ball contact, at such times, then becomes impossible.
This is how monster slices are created and you might also “pull” the golf ball violently. The latter, however, depends on the clubface position at impact.
As a matter of fact, even distance is most likely to get compromised since the chances of striking the center of the sweet spot are drastically minimized. So how to fix this “coming over the top” issue? With the help of these 3 most effective drills!
Impact Tape
It boosts confidence levels and allows you to understand a little something about distance gains. Needless to say, you need impact tape for the drill to work (available online or at a golf department store).
- Put impact tape on the clubface of your driver and iron.
- When on the range, hit multiple shots of varying intensities (including hitting very hard and also hitting slow and easy).
- Now note down which of your golf swings (hard or easy) paved the way for more consistency with the clubface as well as which swings generated the farthest distance.
More often than not, it’s the easy swing types that produce more consistency in terms of making center contact, plus more yardages achieved too.
Glove Under Arm
One of the most serviceable drills for improving golf swing…
- You’ll need a lanyard, make sure it has a clip at the end.
- Put the thing around the neck with any golf club attached to the clip.
- The next step is to place your glove underneath your back right armpit (left for left-handed golfers).
- Now hit some shots.
During your downswing, if that glove drops down before impact (due to your back elbow moving away from the body), know that you’re making the mistake of coming over the top. Instead, approach from the inside to keep the glove from dropping out of the armpit.
Hip Bump
An alignment stick is what you need for this final drill.
- Make the alignment rod stand vertically into the ground.
- Place the outer part of the front left foot (right foot if you’re left-handed) against the stick’s base when addressing the ball.
- The alignment aid should be low enough so that you’re able to swing the arms yet not hit the stick. At the same time, high enough, so that bumping it with the front hip is possible.
- Now it’s time to hit some shots, all the while focusing on bumping the hip into that alignment rod during your downswing.
In case you don’t happen to be “bumping” the alignment stick, then you’re not sufficiently clearing the hips. Do a few practice swings and then try the bumping technique.
Why Does Your Driver Hit A Slice But Not Your Irons?
Slicing a driver is more common than slicing iron shots. The major reason for that is the driver shaft being the longest in any given set, be it a starter, beginner-friendly golf club set, women’s golf clubs, or the best golf clubs for tall men.
Since the driver is the longest, it’s surely going to amp up speed. And more speed, by default, means more difficult to control in comparison to relatively shorter irons.
Combine that with a common mistake you might be making – not changing the setup for off-the-tee shots. It’s required of you, when working with your driver, to hit up. After all, you’re teeing “up” the golf ball, right? However, hitting up affects the swing path direction.
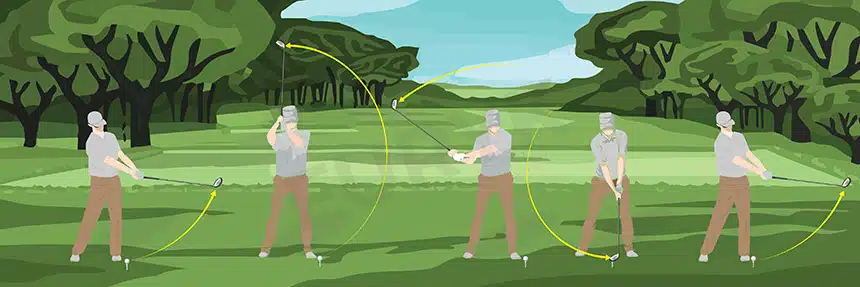
Every swing motion takes on a (vertical) circle shape, so no golf swing is straight up and straight down. In that case, your hula-loop-like swing shape slightly leans or bends in toward the body, which causes the swing path direction to change after hitting the low point.
Following that chain of thought and movement, the clubhead, through descent, travels more toward the right. Hence, during ascent, it’s bound to travel back more toward the left.
On the other hand, irons shots are hit down. Therefore, contact is established prior to that low point. So when you’re hitting the golf ball, your swing path automatically works toward the right. And if the same setup/swing is used for the driver, expect to catch your golf ball during the ascent where the path orients toward the left side of your target.
How to Stop Slicing Long Irons?
The most effective and easiest remedy to the problem of slicing long irons is establishing clubface control. Easier said than done of course, but what will get you there is choking down, just slightly, on the long irons.
What also works is placing the ball farther back, only a little bit, in the stance.
How to Identify A Golf Slice?
Are you fading or slicing your shots? How do you go about diagnosing a slice, a ball flight curving to the right?
Both fades and slices have a right-curving flight path, which makes it very confusing to distinguish between the two. However, keep in mind that a fade, in almost every scenario, is a controlled, intended shot where the ball curves not more than 5-7 yards off your target line.
On the other hand, slices are accidental misses where your shot ends up curving at least 15 yards toward the right of the target. More like a peeling banana!
You could also take into account how much aim adjusting is done in order to keep that golf ball on that fairway. Aiming your shots too far to the left side of the rough, you’re highly prone to slicing the golf ball. Whereas shooting for the fairway’s left-center means you’re fading your hits.
The Wrap-Up
Getting rid of those dreaded, unwanted slices is one of the most annoying goals to achieve in the game of golf. Slices look hideous, and also non-professional, when in the air. More importantly, they make it very difficult for you to achieve lower scores.
So what do most golfers do in order to correct the problem? Well, they often aim left but soon realize that this too is of no help. On the contrary, aiming left leads to producing an overblown slice!
Aiming left only works when you intentionally want to hit a slight, soft fade. To aim left for counterbalancing your slicing tendencies will just result in even bigger misses. It’s such a complicated affair, right? That is why I decided to dedicate one whole post to talking about what is a slice in golf, what causes a slice, and how to avoid/fix this common issue.